How To Cook Hard Boiled Eggs: The Ultimate Guide To Perfect Results Every Time
Have you ever wondered why your hard boiled eggs sometimes turn out with rubbery whites, chalky yolks, or that dreaded green ring around the edges? You're not alone. Cooking the perfect hard boiled egg is a culinary skill that many struggle with, despite its apparent simplicity. Whether you're meal prepping for the week, making deviled eggs for a party, or just want a healthy snack, mastering this fundamental technique can elevate your cooking game significantly.
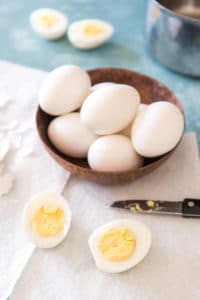
Hard boiled eggs are incredibly versatile—they're packed with protein, vitamins, and minerals, making them a nutritious addition to countless dishes. But the difference between a mediocre egg and a perfectly cooked one is substantial. In this comprehensive guide, we'll walk you through every step of the process, from selecting the right eggs to peeling them smoothly, ensuring you achieve those firm whites and deliciously creamy yellow yolks every single time.
Understanding the Basics: Starting with the Right Foundation
The Cold Water Method: Why It Matters
It's important to start the eggs in cold water — bringing the water and eggs up in temperature together ensures even cooking and prevents cracking. This fundamental technique is the cornerstone of perfect hard boiled eggs. When you place eggs directly into boiling water, the sudden temperature change causes the egg whites to contract rapidly, which can lead to cracks in the shell. These cracks not only affect the appearance but can also allow egg white to seep out during cooking.
- Taobaos English Site Is A Porn Paradise Shocking Leaks Inside
- Shocking Scandal Hayden Panettieres Daughter Caught In Nude Photo Leak
- The Godfather Coda 2020 Exposed Darkest Secrets And Shocking Leaks That Broke The Internet
By starting with cold water, you create a gradual temperature increase that allows the egg whites to heat evenly from the outside in. This gentle approach prevents the formation of air pockets that can cause shells to crack and ensures that the entire egg cooks uniformly. The cold water method also gives you more control over the cooking time, as you can begin timing once the water reaches a rolling boil.
Equipment and Ingredients: Keeping It Simple
All you need are eggs, a pan large enough to hold them, and water to cover. That's it! The beauty of hard boiling eggs lies in its simplicity. However, the size of your pan matters more than you might think. Choose a pot that's large enough to hold all your eggs in a single layer with some space between them. Crowding eggs too closely together can lead to uneven cooking and make them more difficult to remove later.
For the water, use enough to cover the eggs by about an inch. This ensures that all eggs are fully submerged and will cook at the same rate. Some cooks add a teaspoon of salt or a splash of vinegar to the water, claiming it helps with peeling, though this is somewhat controversial among culinary experts.
- Chers Age Leaked Nude Photos Expose The Shocking Truth About Her Real Years
- Exclusive Leak Hayden Panettieres Daughters Secret Video Exposed
- Sex Lies And Data Noise The Viral Scandal Exposing Signal To Noise Ratio
Traditional Stovetop Method: Step-by-Step Perfection
Bringing It to the Right Temperature
Bring the water to a rolling boil over high heat, then immediately remove the pan from the heat. This step is crucial for achieving that perfect texture. A rolling boil means the water is actively bubbling vigorously across the entire surface—not just a few small bubbles here and there. Once you reach this point, removing the pan from heat might seem counterintuitive, but this technique prevents overcooking.
The residual heat in the water continues cooking the eggs gently, which is key to avoiding that rubbery texture that many people dislike. This method gives you more control over the final result and reduces the risk of overcooking, which is often the culprit behind green rings and chalky yolks.
Timing Is Everything
The cooking time depends on the size of your eggs and how firm you want the yolks. For large eggs at room temperature, here's a general guide:
- Soft boiled: 4-6 minutes
- Medium boiled: 6-8 minutes
- Hard boiled: 10-12 minutes
Remember that eggs continue cooking slightly even after you remove them from the water, so it's better to err on the side of slightly underdone if you're unsure.
Alternative Methods: Steaming and Pressure Cooking
The Steaming Technique
Pour an inch of water into a pot and insert a steamer basket. This method has gained popularity among professional chefs and home cooks alike because it produces consistently excellent results. The steam circulates around the eggs more evenly than boiling water, which can sometimes create hot spots.
Place the eggs in the steamer basket, cover, and steam for about 15 minutes. The steam penetrates the shell a bit making the eggs easier to peel. This is because the steam creates a small amount of moisture between the egg white and the membrane just inside the shell, which helps separate them during peeling.
Steaming also tends to produce eggs with slightly more tender whites compared to the traditional boiling method. The gentle, even heat distribution means you're less likely to end up with rubbery textures or uneven cooking.
Pressure Cooker Method: Fast and Foolproof
You can also steam eggs in a pressure cooker! This modern approach has revolutionized egg cooking for many people. Pressure cooking creates a high-pressure environment that cooks eggs incredibly quickly while maintaining moisture and preventing cracking.
The pressure cooker method typically takes about 5-7 minutes at high pressure, followed by a quick release. Many pressure cooker enthusiasts swear by this method because it produces eggs that are consistently easy to peel, even with very fresh eggs that would normally be difficult to peel using traditional methods.
Why Pressure Cooking Works So Well
Its ability to replicate traditional cooking methods while reducing prep time makes it perfect for hard boiled eggs. The high-pressure environment creates a unique cooking dynamic where the eggs cook rapidly but evenly. The steam under pressure penetrates the shell more effectively than regular steam or boiling water, which contributes to the easier peeling characteristic.
Plus, the outcome is a delicate egg with a firm yolk and tender whites, ideal for salads, snacks, or breakfast. The pressure cooking method also tends to produce eggs with a more uniform shape, as the high pressure prevents the whites from spreading out too much during cooking.
Selecting and Preparing Your Eggs
Room Temperature vs. Cold Eggs
Start with eggs that are at room temperature to best predict the cooking time and minimize cracking. Cold eggs straight from the refrigerator can lower the temperature of your cooking water significantly, throwing off your timing. Room temperature eggs also experience less thermal shock when they hit the hot water or steam, reducing the likelihood of cracks.
If you're short on time, you can bring eggs to room temperature by placing them in warm water for about 10-15 minutes before cooking. However, don't leave eggs out at room temperature for extended periods, as this can promote bacterial growth.
Freshness Matters
While it might seem counterintuitive, slightly older eggs are actually better for hard boiling than very fresh ones. As eggs age, they lose moisture and the pH of the whites becomes more alkaline. This change causes the whites to pull away slightly from the shell membrane, making them easier to peel after cooking.
If you're using very fresh eggs, consider the steaming or pressure cooking methods mentioned earlier, as they tend to produce better results with fresh eggs compared to traditional boiling.
Troubleshooting Common Problems
The Dreaded Green Ring
Many home cooks struggle with that unappealing green ring that can form around the yolk. This occurs when eggs are cooked too long or at too high a temperature. The green ring is caused by a reaction between sulfur in the egg white and iron in the yolk, forming ferrous sulfide.
To prevent this, use the timing guidelines provided earlier and avoid overcooking. The immediate removal from heat or steam once cooking is complete is crucial. Some cooks also recommend shocking the eggs in ice water immediately after cooking to stop the cooking process and prevent the green ring from forming.
Peeling Challenges
Making a batch can be super tedious and irritating, especially when it comes to peeling them. Even with perfect cooking, some eggs can be stubbornly difficult to peel. This is often due to the pH level of the egg white and how fresh the eggs are.
To make peeling easier, try these tips:
- Use older eggs when possible
- Add a teaspoon of baking soda to the cooking water (though this can affect the taste slightly)
- Crack the shells all over before peeling by gently rolling the egg on a hard surface
- Peel under running water or in a bowl of ice water
- Start peeling from the wider end where the air pocket is located
Advanced Techniques and Variations
Ramen Eggs: A Japanese Delicacy
Known as ajitsuke tamago or ajitama in Japanese, ramen eggs are delicious as a topping on ramen or enjoyed as a snack. These eggs are typically soft or medium boiled, then marinated in a mixture of soy sauce, mirin, and other seasonings for several hours or overnight.
The result is a savory, umami-rich egg with a custardy yolk that adds incredible depth to ramen bowls. The marinating process also changes the texture of the egg white slightly, giving it a more tender, almost silky quality.
Other Cooking Methods to Explore
For more cooking methods, see how to make hard boiled eggs, how to fry an egg and how to make scrambled eggs in the microwave. While we've focused on hard boiling, it's worth noting that eggs can be prepared in countless ways, each bringing out different qualities of this versatile ingredient.
Soft boiling, for instance, creates eggs with firm whites but runny yolks, perfect for dipping toast soldiers or serving with asparagus. Poaching produces eggs with delicate, silky whites and runny centers, ideal for eggs Benedict or grain bowls.
Storage and Usage Tips
Proper Storage Techniques
Hard boiled eggs can be stored in the refrigerator for up to one week. Keep them in their shells until you're ready to use them, as this provides an additional layer of protection against bacteria. If you've already peeled the eggs, store them in a bowl of cold water in the refrigerator, changing the water daily.
Creative Uses for Hard Boiled Eggs
Hard boiled eggs are a versatile staple in many kitchens. Beyond eating them plain with a sprinkle of salt, they can be:
- Sliced into salads for added protein
- Mashed with mayonnaise and seasonings for classic egg salad
- Halved and filled with various mixtures for deviled eggs
- Chopped and added to potato salad or pasta salad
- Used as a protein-rich snack with vegetables
Conclusion: Mastering the Art of Hard Boiled Eggs
Perfecting the art of hard boiled eggs might seem like a small culinary achievement, but it's one that can significantly impact your cooking confidence and the quality of your meals. By understanding the science behind the cooking process, using the right techniques for your preferred method, and troubleshooting common issues, you can consistently produce eggs with firm whites and deliciously creamy yellow yolks.
Remember that like any cooking skill, making perfect hard boiled eggs takes practice. Don't be discouraged if your first few attempts aren't flawless—each batch teaches you something new about timing, temperature, and technique. Whether you prefer the traditional stovetop method, the modern pressure cooker approach, or the gentle steaming technique, the key is to find what works best for you and your kitchen setup.
With this comprehensive guide, you now have all the tools and knowledge needed to create perfect hard boiled eggs every time. So go ahead, experiment with different methods, and enjoy the satisfaction of mastering this fundamental cooking skill. Your breakfast, lunch, and dinner options just expanded significantly!