How To Make Paper Stars: A Complete Guide To Creating Beautiful Origami Stars
Have you ever wondered how to transform a simple piece of paper into a stunning decorative star? Whether you're looking for a fun craft project, planning festive decorations, or wanting to create meaningful gifts, learning how to make paper stars is a skill that will bring endless creative possibilities. From lucky paper stars to 3D origami stars, this comprehensive guide will walk you through everything you need to know about creating these beautiful paper creations.
Getting Started: Essential Materials and Preparation
Before diving into the world of paper star making, it's important to gather the right materials. The beauty of this craft lies in its simplicity – you don't need expensive tools or specialized equipment to get started.
Choosing the Right Paper
The most crucial element in paper star making is, of course, the paper itself. The paper shouldn't be too wide for creating traditional lucky stars. You can use origami star paper specifically designed for this purpose, or create your own strips from standard 8.5" x 11" paper. Many crafters prefer using a paper cutter for even slices, though you can also measure and trim using scissors if you don't have one available.
- November 10 Horror Florida Mans Bizarre Leak Exposes Shocking Nude Scandal
- Christopher Plummers Secret Sex Tapes From Tv Shows Leaked Fans Are Outraged
- Ramon Rodriguez Sex Tape Scandal Shocking New Leak Exposes Everything
For beginners, it's recommended to start with paper that's about 1 cm wide and 30 cm long. As you gain more experience, you can experiment with different widths and lengths to create stars of various sizes. The paper should be thin enough to fold easily but sturdy enough to hold its shape once completed.
Basic Tools You'll Need
To create beautiful paper stars, you'll need:
- Origami paper or regular paper cut into strips
- Scissors (if cutting your own strips)
- A ruler for measuring
- A paper cutter (optional, but helpful for even strips)
- A flat surface to work on
Simple Paper Star Making for Beginners
⭐ This simple paper star making guide is perfect for beginners, and anyone who loves DIY crafts. These stars are very easy to make, and they're a fun way to recycle a bit of junk mail into something colorful and decorative.
- Gypsy Rose And Ryan Andersons Secret Sex Tape Leaked You Wont Believe Whats Inside
- Taobaos English Site Is A Porn Paradise Shocking Leaks Inside
- What They Buried For 50 Years Nude Photos Just Leaked You Wont Believe Why
Step-by-Step Instructions for Basic Paper Stars
Let's start with the classic origami star that's perfect for beginners:
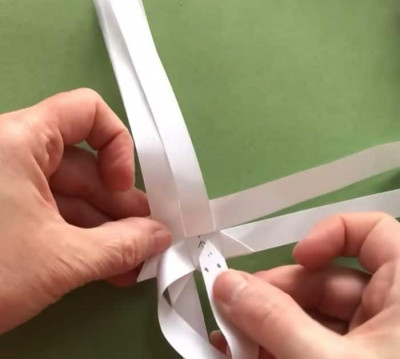
- Prepare your paper strip: Cut your paper to the recommended dimensions (about 1 cm x 30 cm for beginners)
- Create the initial knot: Tie a simple knot at one end of the strip
- Flatten the knot: Gently pull the knot tight and flatten it to form a pentagon shape
- Tuck the short end: Tuck the short end of the paper strip into the pentagon
- Wrap the long end: Wrap the long end around the pentagon, following the edges
- Complete the shape: When you reach the end, tuck in the remaining strip
- Form the star: Pinch the corners of the pentagon to create the star shape
This process might seem challenging at first, but with practice, you'll be able to create perfect stars in just minutes.
Video Tutorial for Visual Learners
Learn how to make a paper star with our step-by-step photo and video tutorial. Visual demonstrations can be incredibly helpful when learning origami techniques, especially for those who are new to paper folding. Watching the process in action helps you understand the subtle movements and techniques that make the difference between a good star and a great one.
Advanced Paper Star Techniques
Once you've mastered the basic lucky star, you might want to explore more advanced techniques and designs.
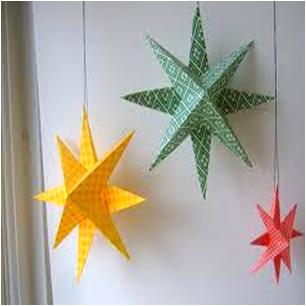
Creating 3D Paper Stars
Learn how to make an origami star and other cool decorations that go beyond the simple lucky star. 3D paper stars add depth and dimension to your decorations and can be used for everything from home decor to party decorations.
To create a 3D star, you'll typically need multiple sheets of paper. The process involves creating individual units that are then assembled together to form the complete star shape. This technique allows for more complex and impressive designs that can serve as statement pieces in your decor.
Multiple Sheet Paper Stars
Free instructions for star made with one sheet of paper and stars from many sheets of paper are available for crafters of all skill levels. Stars made from multiple sheets often have more intricate patterns and can be larger in size, making them perfect for wall decorations or hanging displays.
The technique of using multiple sheets allows for more creative freedom in terms of color combinations and patterns. You can mix and match different papers to create unique designs that reflect your personal style or match your decor theme.
Creative Applications for Paper Stars
Perfect for DIY crafts, home décor, and festive celebrations, paper stars are incredibly versatile decorations that can be adapted for any occasion.
Holiday Decorations
These paper stars make such fun decorations for a birthday party, the 4th of July, or even Christmas. You can create stars in colors that match your holiday theme – red and green for Christmas, red white and blue for Independence Day, or any color combination for birthdays and other celebrations.
Attach them to a present, tape twine or ribbon to the back of your stars to create hanging decorations. You can string multiple stars together to create garlands, or attach individual stars to gifts for a personalized touch.
Home Decor Ideas
Paper stars are a great way to add cute decor for any holiday or event. Consider creating a jar filled with colorful stars as a decorative centerpiece, or make a mobile of different sized stars to hang in a child's room. The possibilities are endless when it comes to incorporating paper stars into your home decor.
You can also create seasonal displays by making stars in colors that reflect the current season – pastels for spring, bright colors for summer, warm tones for autumn, and cool blues and whites for winter.
Gift Ideas and Personal Touches
They're perfect to give as gifts, decorate with, and write your wishes on them. Paper stars make thoughtful handmade gifts that show you've put time and effort into creating something special. You can write personal messages or wishes on the paper before folding it into a star, making each one unique and meaningful.
Consider creating a gift jar filled with stars, each containing a different message or wish for the recipient. This makes for a truly personal and touching gift that can be cherished for years to come.
Tips and Tricks for Perfect Paper Stars
I like using a paper cutter for even slices, but you can also measure and trim using scissors. Consistency is key when making multiple stars, so taking the time to ensure your paper strips are uniform will result in more professional-looking finished products.
Common Mistakes to Avoid
- Using paper that's too thick: Thick paper can be difficult to fold and may not hold the star shape well
- Cutting strips that are too wide: Wider strips create bulkier stars that may not have the delicate appearance you're looking for
- Pulling the knot too tight: This can cause the paper to tear or create an uneven base shape
- Not tucking ends properly: Loose ends can unravel your star, so make sure to tuck them securely
Advanced Techniques for Experienced Crafters
Learn how to make folded paper stars without a template for a more organic, handmade look. While templates can be helpful for beginners, experienced crafters often prefer the freedom of working without them, allowing for more creativity and personal expression in their designs.
You can also experiment with different folding techniques to create stars with varying numbers of points or different dimensional effects. Some advanced techniques involve creating stars with 5, 6, or even 8 points, each requiring slightly different folding methods.
Creating a Paper Star Jar: A Special Project
Create the prettiest origami star jar and learn how to make stars with paper strips with this quick & easy tutorial. A star jar makes a beautiful decorative piece and can also serve as a container for wishes, goals, or memories.
Making Your Star Jar
- Choose your jar: Select a clear glass jar with a lid
- Create your stars: Make multiple stars in coordinating colors
- Fill the jar: Carefully place the stars in the jar, mixing colors for visual interest
- Add personal touches: Include small notes, glitter, or other decorative elements
- Display your creation: Place your star jar where it can catch the light and be admired
This project is perfect for creating meaningful gifts or adding a personal touch to your home decor.
Troubleshooting Common Issues
You won't believe how quickly and easily you can fold a paper star, but even experienced crafters encounter challenges sometimes. Here are solutions to common problems:
Stars Not Holding Shape
If your stars won't hold their shape, try:
- Using slightly thicker paper
- Making sure your initial knot is tight but not too tight
- Pinching the corners more firmly to create sharper points
- Applying a tiny bit of clear glue to secure the final tuck
Uneven or Misshapen Stars
For stars that come out uneven:
- Ensure your paper strips are cut to uniform width
- Practice making consistent folds
- Check that you're wrapping the paper evenly around the pentagon base
- Take your time with each step rather than rushing through the process
Paper Tearing
If your paper keeps tearing:
- Try using a different type of paper that's less prone to tearing
- Make sure your hands are clean and dry
- Be gentler when tightening knots and making folds
- Consider using paper specifically designed for origami
Expanding Your Paper Craft Skills
Discover how to fold beautiful paper stars and master the art of the origami star. Once you've mastered basic star making, you might want to explore other paper crafts that use similar techniques.
Related Paper Crafts to Try
- Origami animals: Many of the folding techniques used in star making apply to creating origami animals
- Paper flowers: These use similar precision folding and can be beautiful additions to your craft repertoire
- Decorative boxes: Origami boxes make great gift containers and use many of the same skills
- Paper quilling: This involves rolling thin strips of paper to create decorative designs
Resources for Continued Learning
Learn how to make paper stars two different ways in this tutorial, but don't stop there. The world of paper crafts is vast and varied. Look for online tutorials, join crafting communities, and don't be afraid to experiment with your own designs.
Conclusion
Learning how to make paper stars opens up a world of creative possibilities, from simple decorations to meaningful handmade gifts. Whether you're a complete beginner or an experienced crafter looking for new challenges, the techniques and projects covered in this guide provide a solid foundation for your paper crafting journey.
Remember that practice makes perfect – your first few stars might not be flawless, but with patience and persistence, you'll soon be creating beautiful stars with ease. Start making your own stars today and discover the joy of transforming simple paper into something truly special.
The beauty of paper star making lies not just in the finished product, but in the meditative process of folding and creating. Each star represents a moment of mindfulness and creativity, making this craft as rewarding for the maker as it is for those who receive or admire the finished pieces. So gather your materials, follow the steps, and let your creativity shine as you embark on your paper star making adventure.