Sex Up Your Car AC: The Ultimate Recharge Guide They Don't Want You To See!
Is your car's air conditioning blowing warm air when it should be delivering crisp, cold comfort? Don't sweat it! We've got the ultimate guide to recharging your car's AC system that the dealerships don't want you to know about. Whether you're dealing with a slight temperature increase or complete cooling failure, this comprehensive guide will walk you through everything you need to know to get your AC blowing cold again.
Automotive air conditioning systems are closed systems designed to be airtight, meaning the refrigerant shouldn't escape unless there's an underlying problem. However, over time, these systems naturally lose refrigerant through normal permeation, minor leaks at connections, and component wear. This gradual loss leads to reduced cooling capacity, longer temperature recovery times, and eventually complete cooling failure if left unaddressed.
First, You'll Need to Check for Leaks
Before you even think about adding refrigerant to your car's AC system, the first critical step is checking for leaks. This isn't just a recommendation—it's absolutely essential for several reasons. Adding refrigerant to a leaking system is like pouring water into a bucket with holes; it's wasteful, expensive, and environmentally irresponsible.
- Shocking Leak Best Buys Secret Midnight Nintendo Switch 2 Store List Exposed Is Your Store Included
- Taobaos English Site Is A Porn Paradise Shocking Leaks Inside
- Exclusive Leak Cloudy With A Chance Of Meatballs 3s Secret Ending Revealed Fans Are Furious
Start by visually inspecting all AC components, including the compressor, condenser, evaporator, and all connecting lines. Look for signs of oil residue, which often indicates a refrigerant leak since refrigerant carries compressor oil throughout the system. Pay special attention to connection points, as these are common failure areas where O-rings can degrade over time.
For a more thorough leak detection, you'll need a UV dye kit or electronic leak detector. UV dye is added to the system and circulates with the refrigerant, making leaks visible under UV light. Electronic leak detectors are highly sensitive tools that can detect even minute amounts of refrigerant escaping from the system. Some professional mechanics also use nitrogen pressure testing, which involves pressurizing the system with nitrogen to identify leaks audibly or with soapy water.
Then, Check the Refrigerant Pressure and Test Your System
Once you've confirmed there are no significant leaks, the next step is checking the refrigerant pressure and testing your system. This is where you'll need a manifold gauge set, which consists of high and low-pressure gauges connected to the appropriate service ports on your AC system.
- Ice Spice Weight Loss Leaked The Forbidden Secret Thats Making Headlines
- November 10 Horror Florida Mans Bizarre Leak Exposes Shocking Nude Scandal
- You Wont Believe Ice Spices Weight Loss Method Its A Total Scandal
Proper pressure readings tell you a lot about your system's health. Low pressure on both the high and low sides typically indicates a refrigerant shortage, while high pressure on one side and low on the other could signal a compressor problem or blockage. The exact pressure readings vary by ambient temperature and vehicle make, so consult your vehicle's service manual for specific values.
While testing pressure, also pay attention to other symptoms. Is the compressor clutch engaging when you turn on the AC? Do you hear any unusual noises? Is there any visible frost or ice on the lines? These observations can help diagnose additional problems beyond just low refrigerant levels.
Finally, You Can Add Your Refrigerant and Finish the Recharge
After confirming there are no leaks and understanding your system's pressure status, you're ready to add refrigerant and complete the recharge process. This step requires patience and precision to avoid overcharging the system, which can be just as problematic as undercharging.
Connect your refrigerant refill hose with gauge to the low-pressure service port—never the high-pressure port. Start your engine and turn the AC to its maximum setting. Slowly add refrigerant while monitoring the pressure gauge, stopping when you reach the manufacturer's specified pressure. The entire process typically takes 10-15 minutes, but rushing can lead to overcharging.
One critical tip: don't rely solely on the gauge reading. Many modern AC systems require precise refrigerant amounts, often within ounces of the specified quantity. Overcharging can reduce cooling efficiency, strain the compressor, and potentially cause system damage. If you're unsure about the exact amount needed, consider having a professional evacuate and recharge the system with the proper quantity.
If You Have a Hybrid or Electric Car, Don't Try to Recharge the Air Conditioner Yourself
This warning cannot be overstated: if you own a hybrid or electric vehicle, do not attempt to recharge the air conditioning system yourself. These vehicles use high-voltage compressors that operate on the same electrical system as the drive motor, creating a serious electrocution hazard during AC service.
The AC systems in hybrid and electric vehicles operate at voltages ranging from 200 to over 400 volts, which can be lethal if proper safety procedures aren't followed. Even disconnecting the battery isn't sufficient, as the system maintains dangerous voltages through capacitors. Specialized training, equipment, and safety protocols are required to service these systems safely.
Additionally, hybrid and electric vehicle AC systems often use different refrigerants, such as R-1234yf instead of the more common R-134a, and require specific procedures for proper servicing. The cost of professional service is minimal compared to the risk of injury or the potential damage from improper servicing.
Is Your Car's AC Blowing Warm Air?
When your car's AC starts blowing warm air, it's a clear sign that something isn't right with the system. While low refrigerant is the most common culprit, several other issues can cause this problem. Understanding the root cause is crucial before attempting any DIY repairs.
Common causes of warm air from your AC include: a faulty compressor that isn't circulating refrigerant, a clogged condenser that can't dissipate heat, a malfunctioning blend door that's stuck on the heater side, or electrical issues preventing the system from operating correctly. Sometimes, the problem isn't with the AC system at all but with the cooling fans or radiator, which can affect overall temperature regulation.
Before assuming you need a refrigerant recharge, check the obvious things first. Is the AC compressor clutch engaging when you turn on the system? Are the cooling fans operating when the AC is on? Is there any visible damage to the condenser (located in front of the radiator)? These simple checks can help you identify whether the issue is truly low refrigerant or something more serious.
To Recharge Your Car's AC System, You Will Need a Few Essential Tools
Gathering the right tools before starting your AC recharge project will make the process much smoother and more professional. While DIY AC recharge kits offer convenient, low-cost solutions, they often lack the precision and safety features of professional-grade equipment.
The most important tool you'll need is a vacuum pump, which is required to remove moisture and air from the system before adding new refrigerant. Moisture in the AC system is particularly problematic as it can freeze in the expansion valve, causing intermittent cooling, and it can react with refrigerant to form corrosive acids that damage system components. A quality vacuum pump ensures your system is clean, dry, and ready for optimal performance.
You'll also need a manifold gauge set with both high and low-pressure ports, which allows you to monitor system pressure during the recharge process. Safety glasses and gloves are essential when working with refrigerants, which can cause frostbite on contact with skin and are harmful if inhaled. A refrigerant scale is helpful for measuring exact amounts, especially if you're charging by weight rather than pressure. Finally, have your vehicle's service manual handy for specific pressure specifications and refrigerant capacity information.
The Process of Refilling Your AC Refrigerant While Refilling Your Car's AC Refrigerant Can Be a Straightforward Task
The process of refilling your car's AC refrigerant can indeed be a straightforward task, but it requires careful attention to detail to ensure you don't introduce any issues that could damage your system or reduce its efficiency. Many DIY enthusiasts make the mistake of rushing through the process or skipping important steps, leading to poor performance or even system damage.
Start by ensuring your vehicle is parked on a level surface with the engine off. Locate the low-pressure service port, which is typically marked with an "L" and is smaller than the high-pressure port. Never attempt to add refrigerant through the high-pressure port, as this can cause the can to explode under system pressure. Connect your manifold gauge set and verify the current pressure reading.
If you're using a DIY recharge kit, follow the instructions carefully, but be aware of their limitations. These kits often use pressure-based charging rather than weight-based, which can lead to overcharging in hot weather or undercharging in cold weather. If you have access to a refrigerant scale, weight-based charging is more accurate and recommended for optimal system performance. Add refrigerant slowly while the engine is running and the AC is on maximum, watching the pressure gauge carefully.
Gather Your Tools and Materials As Mentioned, You Will Need the Following
Before beginning your AC recharge project, take time to gather all necessary tools and materials. Being prepared will save you frustration and ensure a smoother, more professional result. Here's what you'll need for a successful AC recharge:
Essential Tools:
- Manifold gauge set with hoses
- Refrigerant refill hose with gauge
- Vacuum pump (if evacuating the system)
- Safety glasses and chemical-resistant gloves
- Refrigerant scale (recommended for accuracy)
- Basic hand tools (for accessing service ports if needed)
Materials Needed:
- Correct type and amount of refrigerant (check your vehicle's specifications)
- Replacement service port caps (if old ones are damaged)
- UV dye (optional, for leak detection)
- O-ring lubricant (if disturbing any connections)
Optional but Helpful:
- Thermometer for measuring vent temperature
- Infrared temperature gun for checking component temperatures
- Service manual for your specific vehicle
- Notepad for recording pressure readings and temperatures
Having everything organized before you start will prevent mid-project trips to the auto parts store and help you work more efficiently. Remember to work in a well-ventilated area away from open flames, as refrigerants can be hazardous if mishandled.
AC Refrigerant Can Refrigerant Refill Hose with Gauge
The AC refrigerant can with a built-in refill hose and gauge is the most common DIY solution for AC recharging, and while convenient, it has both advantages and limitations you should understand before use.
These all-in-one kits typically include a pressurized can of refrigerant with an attached hose and pressure gauge. The gauge helps you monitor system pressure as you add refrigerant, preventing some of the overfilling issues common with older DIY methods. Many also include a trigger or trigger-lock mechanism for controlled refrigerant release.
However, these kits have significant limitations. The built-in gauges are often less accurate than professional manifold gauges and may not account for temperature variations that affect pressure readings. They also typically don't include a way to vacuum the system, meaning any moisture or air already in the system remains. Additionally, most kits only provide enough refrigerant for a partial recharge, which might be insufficient if your system is significantly low.
For best results with these kits, use them as a top-off solution rather than a complete recharge, and always follow the specific instructions provided. If your system is very low or empty, professional evacuation and recharge is the better option to ensure optimal performance and longevity.
Learn When a DIY AC Recharge Is Safe, What Tools You Need, and How to Spot Problems That Require a Professional
Understanding when a DIY AC recharge is appropriate and when to call a professional is crucial for both your safety and your vehicle's AC system health. Not every AC problem is suitable for DIY repair, and attempting to fix the wrong issue can lead to wasted money, environmental damage, or even personal injury.
DIY AC recharge is generally safe when you're dealing with a known, slow refrigerant leak in a conventional vehicle (not hybrid or electric), and you have the proper tools and safety equipment. You should be comfortable working with pressurized systems and understand the basics of AC operation. The system should hold a vacuum for at least 10-15 minutes when tested, indicating no major leaks that would immediately waste added refrigerant.
However, certain situations require professional attention. If you can't locate the low-pressure service port, if the system is completely empty (indicating a major leak), if you notice oil residue around components, if the compressor isn't engaging, or if you have a hybrid/electric vehicle, call a professional. Additionally, if you've already tried a DIY recharge and it didn't solve the problem, continuing to add refrigerant without diagnosing the real issue can cause more damage. Professionals have the diagnostic tools, experience, and refrigerant recovery equipment to properly service AC systems while protecting the environment.
Get Practical Steps to Restore Cold Air and Protect Your System
Now that you understand the basics, let's walk through practical steps to restore cold air to your vehicle while protecting your AC system from damage. These steps will help you achieve the best possible results from your DIY recharge effort.
Step 1: Preparation and Safety
Park your vehicle in a well-ventilated area away from ignition sources. Wear safety glasses and chemical-resistant gloves. Locate the low-pressure service port (usually on the larger diameter line near the firewall). If you can't find it, consult your service manual—never use the high-pressure port.
Step 2: System Inspection
Start the engine and turn the AC to maximum with the fan on high. Observe whether the compressor clutch engages. Use a thermometer in the center vent to measure current air temperature. Check that both engine cooling fans operate when the AC is on.
Step 3: Pressure Testing
Connect your manifold gauge set and note the pressure readings with the engine running and AC on maximum. Compare these to the specifications for your ambient temperature (available in service manuals or online charts). Low pressure on both sides typically indicates low refrigerant.
Step 4: Vacuum and Moisture Removal
If you have access to a vacuum pump, evacuate the system for 30-45 minutes to remove air and moisture. This step is crucial for optimal performance but often skipped in DIY applications. If you skip this, ensure your system isn't severely contaminated.
Step 5: Refrigerant Addition
Connect your refrigerant can to the low-pressure port. With the engine running and AC on maximum, slowly add refrigerant while monitoring the pressure gauge. Stop when you reach the manufacturer's specified pressure or when vent temperatures stop dropping (typically around 40°F/4°C).
Step 6: Final Testing
After charging, monitor vent temperatures for 10-15 minutes to ensure they stabilize at a cold level. Check that the compressor cycling is appropriate (not constantly running or rapidly cycling). Take another pressure reading to confirm it's within specifications.
Read the Full Guide to Recharge Your Car's AC with Confidence
Recharging your car's AC system with confidence comes from understanding the entire process, having the right tools, and knowing your limitations. This comprehensive guide has covered everything from basic leak detection to proper refrigerant charging procedures, but there's always more to learn about automotive AC systems.
Confidence in DIY AC work comes from preparation and respect for the system's complexity. Take time to research your specific vehicle's requirements, including the correct refrigerant type (R-134a for most vehicles after 1995, R-1234yf for many newer vehicles), proper oil type if you're opening the system, and exact pressure specifications. Join online forums or watch detailed YouTube tutorials specific to your vehicle make and model for additional insights.
Remember that while DIY AC recharging can save money and be satisfying, it's not always the best solution. If you're unsure about any step, if the problem seems complex, or if you've tried DIY methods without success, professional service is worth the investment. A properly serviced AC system not only keeps you comfortable but also prevents costly repairs down the road and protects the environment from refrigerant leaks.
Complete Guide to Refrigerant Servicing, Leak Detection, and System Diagnosis
Automotive air conditioning systems lose refrigerant over time through normal permeation, minor leaks at connections, and component wear, causing reduced cooling capacity, longer temperature recovery times, and eventual complete cooling failure. Understanding the complete picture of AC system health helps you make informed decisions about maintenance and repair.
Refrigerant servicing involves more than just adding refrigerant. It includes checking system pressures, inspecting components for wear or damage, verifying proper compressor operation, and ensuring all electrical controls function correctly. A complete service might involve recovering old refrigerant (as required by law), evacuating the system to remove moisture and contaminants, leak testing with UV dye or electronic detectors, and precisely charging with the correct refrigerant type and amount.
Leak detection is a critical part of AC servicing. Small leaks can be difficult to find but cause gradual performance loss over months or years. Professional technicians use various methods including UV dye injection and inspection under black light, electronic leak detectors that sense refrigerant presence, nitrogen pressure testing to identify audible leaks, and bubble solutions applied to joints and connections. For DIY mechanics, UV dye kits offer a good balance of effectiveness and affordability for finding common leaks.
System diagnosis goes beyond simple pressure checks. It involves understanding how all AC components work together as an integrated system. The compressor must provide adequate pressure, the condenser must reject heat effectively, the expansion valve or orifice tube must regulate refrigerant flow correctly, and the evaporator must absorb heat efficiently. Electrical issues, such as faulty pressure switches, bad relays, or corroded connections, can prevent the system from operating even when mechanical components are fine. A systematic diagnostic approach saves time and money by identifying the real problem rather than just treating symptoms.
While DIY AC Recharge Kits Offer Convenient, Low-Cost Solutions
While DIY AC recharge kits offer convenient, low-cost solutions for restoring your car's cooling, they come with important limitations and considerations that every car owner should understand before use.
The primary advantage of DIY kits is their accessibility and simplicity. They allow you to add refrigerant without specialized tools or training, often costing $30-50 compared to $100-300 for professional service. For simple cases of slight undercharging due to minor permeation losses, these kits can be effective and provide immediate relief from warm air.
However, the limitations are significant. Most kits use pressure-based charging rather than weight-based, which can lead to inaccurate charging amounts. They typically don't include system evacuation, meaning moisture and air remain in the system, potentially reducing efficiency and longevity. The single-use cans create more waste than professional service equipment. Most importantly, these kits don't address underlying problems—if your system is empty, you have a major leak that needs professional repair, not just a recharge.
For the best balance of cost and effectiveness, consider using DIY kits only for minor top-offs when you know your system is just slightly low, and always follow up with professional service if problems persist or if you notice oil residue indicating a significant leak.
A Vehicle's Air Conditioning Is a Closed System, Which Means It Is Airtight
A vehicle's air conditioning is a closed system, which means it is airtight by design. This fundamental characteristic is crucial to understanding how AC systems work and why they sometimes fail. In a properly functioning system, the refrigerant circulates continuously between liquid and gas states, absorbing heat from inside the vehicle and releasing it outside, without ever escaping the sealed system.
The airtight nature of AC systems means that refrigerant loss should be minimal under normal conditions. Modern systems are designed with tight seals, quality hoses, and properly torqued connections to prevent leakage. When refrigerant levels drop, it indicates a problem somewhere in the system—whether it's a small permeation loss through hoses over time, a minor leak at a connection point, or a more serious leak from a damaged component.
Understanding this closed system concept helps explain why simply adding refrigerant without addressing the underlying cause is a temporary fix at best. If your system needed a recharge last year and needs one again this year, you likely have a leak that requires repair. Continuously adding refrigerant to a leaking system wastes money, harms the environment, and may mask developing problems that could lead to more expensive repairs if left unaddressed.
The Refrigerant Shouldn't Escape Unless There Is an Underlying Problem
The principle that refrigerant shouldn't escape unless there is an underlying problem is fundamental to AC system operation and maintenance. This understanding should guide your approach to AC service and help you make informed decisions about when DIY methods are appropriate versus when professional help is needed.
Common underlying problems that cause refrigerant loss include: deteriorated O-rings at connection points, which shrink and harden over time; corroded or damaged refrigerant lines from road debris or rubbing against other components; failed compressor shaft seals, which wear from normal operation; leaking condenser or evaporator cores due to corrosion or physical damage; and loose or improperly sealed service port caps. Even the Schrader valves (similar to tire valves) that seal the service ports can leak if damaged or old.
Identifying the specific cause of refrigerant loss often requires professional diagnosis, especially for small leaks that may take months to show noticeable effects. UV dye can help locate leaks, but some may only be visible during system operation or may be too small for dye to effectively highlight. Professional electronic leak detectors can sense refrigerant concentrations as low as 0.25 ounces per year, making them valuable for finding elusive leaks that DIY methods might miss.
Unless the AC System Needs Repair, You Shouldn't Have to Recharge It
The statement that unless the AC system needs repair, you shouldn't have to recharge it is perhaps the most important concept in AC system maintenance. This principle underscores why continuous recharging without addressing underlying issues is counterproductive and potentially harmful.
A healthy AC system in good condition should maintain its refrigerant charge for the life of the vehicle, with only minimal losses from normal permeation. If you find yourself needing to recharge every year or even every few years, you have a leak that requires repair. The cost of professional leak repair, while potentially several hundred dollars, is often less than the cumulative cost of repeatedly buying DIY recharge kits and is certainly less than the cost of major system damage from operating with low refrigerant.
Low refrigerant doesn't just reduce cooling capacity—it can cause serious damage to the compressor. The refrigerant also carries lubricating oil through the system, and low levels mean inadequate lubrication. Additionally, refrigerant helps cool the compressor, and insufficient refrigerant can cause overheating. Running an AC system with low refrigerant can lead to compressor failure, which often costs $500-1500 to replace, far exceeding the cost of repairing a leak.
Using a DIY AC Recharge Kit May Delay a Trip to a Professional as the Problem Worsens or Make Things Worse by Overcharging
Using a DIY AC recharge kit may delay a trip to a professional as the problem worsens or make things worse by overcharging, highlighting the risks of the band-aid approach to AC problems. While DIY methods have their place, understanding these risks helps you make better decisions about AC system care.
Delaying professional diagnosis by repeatedly using DIY recharge kits allows underlying problems to worsen. A small leak that might have been an inexpensive fix can grow larger, potentially damaging other components. Moisture that enters through a leak can circulate through the system, causing corrosion and reducing efficiency. Contaminated refrigerant can damage the compressor and other expensive components. What starts as a simple leak repair can evolve into a complete system replacement if problems are ignored.
Overcharging is another significant risk with DIY methods, particularly when using pressure-based charging rather than weight-based. Overcharged systems operate at higher pressures, which strains the compressor and can cause it to fail prematurely. Excess refrigerant can also reduce cooling efficiency by not allowing proper circulation through the evaporator. In extreme cases, overcharging can cause hoses to burst or compressors to fail catastrophically. Professional charging equipment includes scales that measure exact refrigerant weights and recovery machines that ensure proper evacuation before charging, preventing these issues.
Read Our Guide to Find Out More
If you've found this guide helpful and want to learn more about automotive AC systems, there's a wealth of additional information available to help you become more knowledgeable about your vehicle's cooling system. Understanding AC operation, maintenance, and troubleshooting can save you money and help you make informed decisions about service options.
Beyond basic recharging, consider learning about AC system components and their functions. Understanding how the compressor creates pressure, how the condenser rejects heat, how the expansion device meters refrigerant, and how the evaporator absorbs heat helps you diagnose problems more effectively. Learn about the different types of refrigerants and why using the correct type is crucial for system operation and environmental compliance.
Explore topics like preventive maintenance, which can extend AC system life and prevent costly repairs. Simple steps like running the AC periodically during winter to lubricate seals, keeping the condenser clean and free of debris, and addressing unusual noises or performance changes promptly can prevent major problems. Understanding when to seek professional help versus when DIY is appropriate can save you from costly mistakes while ensuring your AC system provides reliable cooling for years to come.
When an AC System Loses Its Ability to Cool Properly, You May Need to Recharge It
When an AC system loses its ability to cool properly, you may need to recharge it, but this should be the conclusion of your troubleshooting process, not the first step. Understanding the diagnostic process helps you identify the real problem and apply the appropriate solution.
Start with the simplest checks: Is the compressor clutch engaging when you turn on the AC? Are the cooling fans operating? Is there any visible damage to the condenser or debris blocking airflow? Check the cabin air filter, as a clogged filter can restrict airflow and make the AC seem less effective. Use a thermometer to measure vent temperatures—if they're above 50°F (10°C) when they should be around 40°F (4°C), you have a cooling problem.
If basic checks don't reveal the issue, move to pressure testing. Low pressure on the low side with the compressor running typically indicates low refrigerant, while high pressure on both sides could indicate a compressor or expansion device problem. No pressure reading might indicate a major leak or electrical issue preventing the compressor from running. Only after confirming low refrigerant through proper pressure testing should you proceed with recharging, and even then, adding a leak detector dye during the recharge can help identify the source of the loss for future repair.
Learn How to Recharge Your Car's AC in 8 Easy Steps
Learning how to recharge your car's AC in 8 easy steps provides a structured approach to the process, ensuring you don't miss critical steps that could affect system performance or longevity. Here's a comprehensive step-by-step guide:
Step 1: Safety Preparation
Park in a well-ventilated area, wear safety glasses and gloves, and gather all necessary tools and materials. Locate the low-pressure service port and ensure you have the correct refrigerant type for your vehicle.
Step 2: System Inspection
Start the engine and turn the AC to maximum with the fan on high. Check that the compressor clutch engages and that cooling fans operate. Measure current vent temperature with a thermometer.
Step 3: Pressure Testing
Connect manifold gauges and note pressure readings with the engine running and AC on maximum. Compare to specifications for your ambient temperature. Low readings on both gauges typically indicate low refrigerant.
Step 4: Leak Detection
If pressure is low, add a small amount of UV dye (if not already in system) and use a UV light to check for visible leaks around connections, the compressor, and other components.
Step 5: System Evacuation (Recommended)
If you have a vacuum pump, evacuate the system for 30-45 minutes to remove air and moisture. This step is crucial for optimal performance but often skipped in DIY applications.
Step 6: Refrigerant Addition
Connect your refrigerant can to the low-pressure port. With the engine running and AC on maximum, slowly add refrigerant while monitoring the pressure gauge. Stop when you reach the manufacturer's specified pressure.
Step 7: Performance Verification
After charging, monitor vent temperatures for 10-15 minutes. They should stabilize around 40°F (4°C). Check that the compressor cycling is appropriate and that pressures remain within specifications.
Step 8: Final Checks
Verify that all cooling fans operate correctly, check for any unusual noises, and use UV light to confirm no new leaks have developed during the recharge process.
In This Comprehensive DIY Tutorial, I'll Show You How to Recharge Your Car's Air Conditioning System (A/C) with R134a Refrigerant in a Few Simple Steps
In this comprehensive DIY tutorial, I'll show you how to recharge your car's air conditioning system (A/C) with R134a refrigerant in a few simple steps, providing you with the knowledge and confidence to tackle this common automotive maintenance task.
R134a became the standard automotive refrigerant in the mid-1990s, replacing the ozone-depleting R12. Most vehicles manufactured after 1995 use R134a, though many newer vehicles (2015 and later) use the more environmentally friendly R-1234yf. Always verify your vehicle's refrigerant type before purchasing supplies—using the wrong refrigerant can damage your system and is often illegal.
The process begins with safety preparation and system inspection, as outlined in the 8-step guide above. When working with R134a specifically, remember that while it's less harmful to the ozone layer than R12, it's still a greenhouse gas that should never be vented to the atmosphere. Professional technicians use recovery machines to capture old refrigerant, but DIYers typically add to existing charge rather than replacing it entirely.
For R134a systems, typical operating pressures range from 25-40 psi on the low side and 200-350 psi on the high side, depending on ambient temperature and system design. These pressures will be higher in hot weather and lower in cold weather. Always consult your vehicle's specifications rather than relying solely on generic pressure charts, as system capacities and operating characteristics vary significantly between vehicle makes and models.
You Will Know How to Recharge Your Car Air Conditioner with Six Steps from Inspecting the System to Adding Refrigerant Including the Pressure Chart
You will know how to recharge your car air conditioner with six steps from inspecting the system to adding refrigerant, including understanding pressure charts that are essential for proper charging. This condensed approach focuses on the most critical aspects of DIY AC recharging.
Step 1: Visual Inspection and Basic Testing
Check for obvious damage, listen for clutch engagement, verify fan operation, and measure current vent temperature. These simple checks can identify problems that recharging won't fix.
Step 2: Pressure Diagnosis
Connect gauges and compare readings to a pressure chart that accounts for ambient temperature. Low pressure on both sides indicates low refrigerant; high pressure might indicate a blockage or compressor problem.
Step 3: Leak Verification
If pressure is low, add UV dye if not already present and check for leaks with a UV light. Address any significant leaks before recharging, as adding refrigerant to a leaking system wastes money and harms the environment.
Step 4: Refrigerant Addition
Connect your recharge kit to the low-pressure port. With the engine running and AC on maximum, add refrigerant slowly while watching the pressure gauge and monitoring vent temperature improvement.
Step 5: Pressure Monitoring
Continue adding refrigerant until you reach the pressure specified for your current ambient temperature, or until vent temperatures stop improving (usually around 40°F/4°C).
Step 6: Final Testing
Run the system for 15-20 minutes to verify stable operation, check that pressures remain within specifications, and confirm that vent temperatures stay consistently cold.
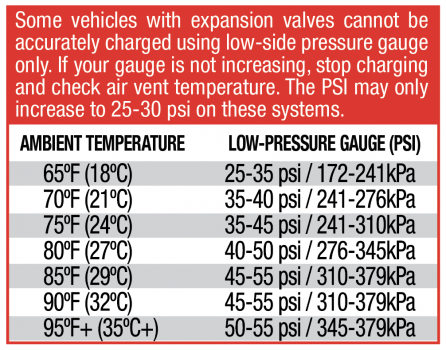
Understanding pressure charts is crucial for this process. These charts show the relationship between ambient temperature and expected system pressures. For example, on a 75°F day, a properly charged R134a system might show 35-40 psi on the low side and 200-250 psi on the high side. On a 95°F day, those numbers might be 45-50 psi low and 300-350 psi high. Using these charts prevents overcharging in hot weather or undercharging in cold weather.
Low Refrigerant Levels Can Prevent Your Vehicle's Air Conditioning from Working Properly, but That Isn't the Only Thing You Need to Check
Low refrigerant levels can prevent your vehicle's air conditioning from working properly, but that isn't the only thing you need to check when diagnosing AC problems. Understanding the full range of potential issues helps you apply the right solution and avoid wasting time and money on unnecessary recharging.
Other common causes of poor AC performance include: a faulty compressor that isn't creating adequate pressure; a clogged condenser that can't reject heat effectively; a malfunctioning expansion valve or orifice tube that's not metering refrigerant correctly; electrical problems like blown fuses, bad relays, or faulty pressure switches; a broken AC clutch that isn't engaging the compressor; or even simple issues like a clogged cabin air filter restricting airflow over the evaporator.
Before assuming you need a recharge, check these components systematically. Listen for the compressor clutch clicking when you turn on the AC. If it doesn't engage, check fuses and relays first. Feel the condenser (in front of the radiator) when the AC is running—both sides should be warm, not ice-cold or hot in isolated areas. Check that both cooling fans operate when the AC is on. If you have access to an infrared thermometer, check that the low-pressure line is cold and the high-pressure line is hot when the system is operating correctly.
Learn About the Costs of an AC Recharge and Other Associated Services
Learning about the costs of an AC recharge and other associated services helps you budget for maintenance and make informed decisions about DIY versus professional service. Understanding the full cost picture prevents surprises and helps you evaluate the value of different service options.
DIY AC recharge kits typically cost $30-60 for a single-use can with gauge, providing enough refrigerant for a partial recharge of most vehicles. Professional AC recharge services generally cost $100-300, depending on your location, vehicle type, and whether the service includes system evacuation and vacuum testing. Luxury or hybrid vehicles often cost more due to specialized procedures or refrigerant types.
If your system has a major leak requiring repair, costs increase significantly. Simple leak repairs like replacing O-rings or hoses might cost $150-400, while compressor replacement typically runs $500-1500 including parts and labor. Condenser replacement costs $400-900, and evaporator replacement (often requiring dashboard removal) can cost $800-1500. These higher costs underscore why addressing leaks promptly through professional diagnosis is often more economical than repeatedly using DIY recharge kits.
Consider also the environmental and legal costs of improper refrigerant handling. Venting refrigerant to the atmosphere is illegal in many jurisdictions and can result in fines. Professional service includes proper refrigerant recovery and recycling, protecting both the environment and you from potential liability.
Does Your Car's AC Stop Blowing Cold Air?
Does your car's AC stop blowing cold air? This common complaint has several potential causes, and understanding the diagnostic process can help you identify the real problem before attempting any repairs. Not every AC problem requires a refrigerant recharge, and misidentifying the issue can lead to wasted time and money.
Start by noting when the problem occurs. Does the AC blow warm air immediately upon startup, or does it start cold then gradually warm up? Immediate warm air might indicate an electrical problem preventing compressor operation, while gradually warming air often suggests low refrigerant or a failing compressor. Does the problem occur only at idle or only when driving? This can indicate cooling fan issues or condenser airflow problems.
Check the obvious things first: Is the AC button lighting up when pressed? Are there any warning lights on the dashboard? Is the cabin air filter clean and allowing proper airflow? Sometimes, what seems like an AC problem is actually a blend door issue where the system can't direct enough air across the cold evaporator. A professional diagnosis using manifold gauges and systematic testing can identify the real cause and save you from unnecessary part replacements or refrigerant additions.
If So, It May Be Time to Recharge the Refrigerant
If so, it may be time to recharge the refrigerant, but only after confirming that low refrigerant is indeed the problem through proper diagnosis. Jumping straight to recharging without testing can mask developing issues and lead to more expensive repairs later.
Confirm low refrigerant through pressure testing before recharging. Connect manifold gauges and compare readings to specifications for your current ambient temperature. If both the high and low sides show significantly below-normal pressure, and the compressor clutch is engaging, low refrigerant is likely the cause. However, if pressure is extremely low or zero, you may have a major leak that needs repair before recharging.
Consider the age and service history of your vehicle. If it's never had an AC service and is over 8-10 years old, gradual refrigerant loss through permeation is normal and a recharge might be appropriate. However, if the system was recently serviced or the vehicle is newer, a sudden need for recharge suggests a leak that requires professional attention. Adding refrigerant without fixing leaks is a temporary solution that becomes increasingly expensive over time.
In This Article, We'll Show You How to Recharge Your Car's AC in a Few Simple Steps
In this article, we've shown you how to recharge your car's AC in a few simple steps, providing you with the knowledge to tackle this common maintenance task confidently. However, the simplicity of the process shouldn't overshadow the importance of proper diagnosis and safety considerations.
The key steps we've covered include: verifying the need for recharge through pressure testing rather than assumption; checking for leaks before adding refrigerant; using proper safety equipment when handling pressurized systems; adding refrigerant slowly while monitoring pressures and temperatures; and verifying proper system operation after charging. Each step plays a crucial role in ensuring your AC system operates efficiently and reliably.
Remember that while DIY AC recharging can save money and be satisfying, it has limitations. Complex problems, hybrid/electric vehicles, and systems with major leaks require professional service. The goal is not just cold air today, but reliable, efficient cooling for years to come. When in doubt, professional diagnosis can prevent costly mistakes and ensure your AC system receives the appropriate care.
I Recharged the Refrigerant in My Polo's AC System Some Time Back
I recharged the refrigerant in my Polo's AC system some time back, and the experience taught me valuable lessons about DIY AC service that I'll share to help you avoid common pitfalls and achieve better results.
My car's AC cooling effect had noticeably reduced, and I could feel it during my daily drives in city traffic. The vent temperature was around 55-60°F when it should have been closer to 40°F. After researching and gathering the necessary tools, I connected my manifold gauge set and found that the low side pressure was about 10 psi below the specification for the ambient temperature.
Following the pressure readings, I added refrigerant slowly while monitoring both the gauge and vent temperature. The process took about 15 minutes, with the compressor cycling on and off as I added refrigerant. I stopped when the low-side pressure reached the specified value, and immediately noticed improved cooling. The vent temperature dropped to around 42°F and stayed there consistently.
However, the experience also highlighted some important considerations. The factory manual specified an exact refrigerant capacity by weight (14 ounces), but I was charging by pressure due to not having a refrigerant scale. This meant I might have been slightly over or under the ideal amount. Additionally, I noticed that vent temperatures were slightly higher in stop-and-go traffic than on the highway, suggesting my condenser might benefit from cleaning. These observations underscore how even successful DIY recharges can reveal areas for improvement or indicate when professional service might be beneficial.
The AC's Cooling Effect in My Car Had Noticeably Reduced and I Could Feel It During My Daily Drives
The AC's cooling effect in my car had noticeably reduced, and I could feel it during my daily drives, which prompted me to investigate and ultimately perform a refrigerant recharge. This gradual decline in performance is often how AC problems manifest, making them easy to overlook until they become significant.
The symptoms I noticed included: vent air that was cool but not cold, especially during hot weather or in traffic; longer times needed to achieve comfortable cabin temperatures; and the AC seeming less effective on the passenger side compared to the driver's side. These subtle changes accumulated over several weeks, with the system gradually losing its ability to remove heat efficiently from the cabin.
Using a thermometer, I measured vent temperatures and found them consistently 8-10°F warmer than when the system was new. This temperature difference, while seeming small, significantly impacts comfort and makes the AC work harder to maintain desired temperatures. The gradual nature of the decline suggested either a very slow leak or normal refrigerant permeation rather than a sudden major failure, making DIY recharge a reasonable first step before seeking professional service.
This Video Can Show You the Basics of Recharging an AC System
This video can show you the basics of recharging an AC system, providing visual guidance that complements written instructions and helps you understand the process before attempting it yourself. While this article provides comprehensive information, seeing the process in action can build confidence and clarify steps that might seem confusing in text alone.
Quality AC recharge videos typically demonstrate: proper safety equipment and its use; locating service ports and identifying the low-pressure side; connecting manifold gauges correctly; reading and interpreting pressure gauge readings; adding refrigerant slowly and watching pressure changes; and testing system performance after charging. Look for videos specific to your vehicle make and model when possible, as port locations and procedures can vary.
However, be aware that many online videos oversimplify the process or omit important safety steps. Some may show techniques that aren't recommended, such as overcharging to compensate for warm ambient temperatures or ignoring leak testing. Use videos as a supplement to thorough research rather than your sole source of information, and always prioritize safety and proper procedures over quick results.
I Would Urge You Perform Safe Practices When Working with AC and Avoid Venting Refrigerant into the Atmosphere
I would urge you to perform safe practices when working with AC and avoid venting refrigerant into the atmosphere, as both personal safety and environmental protection should be top priorities when servicing automotive AC systems. Refrigerants are chemicals that require respect and careful handling.
Personal safety practices include wearing safety glasses and chemical-resistant gloves to protect against frostbite from refrigerant contact with skin. Work in a well-ventilated area to avoid inhaling refrigerant vapors, which can cause respiratory irritation and other health issues. Keep ignition sources away from your work area, as some refrigerants are flammable under certain conditions. Never connect refrigerant cans to the high-pressure service port, as this can cause can rupture and serious injury.
Environmental protection is equally important. Refrigerants are potent greenhouse gases that contribute to climate change when released. Many are also ozone-depleting substances, though R134a is less harmful in this regard than older refrigerants like R12. Venting refrigerant is illegal in many jurisdictions and can result in substantial fines. Use the entire contents of DIY recharge cans rather than venting partially used cans. If you're disconnecting AC components, use proper recovery equipment or take the vehicle to a professional who has the necessary tools to capture and recycle refrigerants.
Feeling the Summer Heat a Bit Too Much Inside Your Vehicle
Feeling the summer heat a bit too much inside your vehicle is often what motivates people to address AC problems, but before rushing to recharge the system, consider whether other factors might be contributing to reduced cooling performance.
Sometimes, what feels like an AC problem is actually related to other vehicle systems or conditions. A failing cooling system can cause higher engine temperatures, which radiate heat into the cabin. Damaged or missing AC system insulation allows engine heat to enter the passenger compartment. Even something as simple as parking in direct sunlight can make your AC seem less effective as it struggles to overcome the initial heat load.
Before assuming you need a refrigerant recharge, try these steps: park in shade when possible and use a reflective windshield sunshade; ensure your cabin air filter is clean and replaced regularly; check that all AC vents are open and unobstructed; verify that your cooling fans operate correctly when the AC is on; and clean debris from the condenser (located in front of the radiator) that might block airflow. These simple steps can significantly improve AC performance without any refrigerant service.
It's Time We Address That by Recharging Our Car's Air Conditioning with R134a Refrigerant
It's time we address that by recharging our car's air conditioning with R134a refrigerant, but only after confirming that low refrigerant is the actual problem through proper diagnosis. The satisfaction of restoring cold air to your vehicle makes DIY AC service appealing, but approaching it with the right knowledge ensures better results and prevents potential problems.
R134a refrigerant became the automotive standard in the mid-1990s, offering better environmental characteristics than its predecessor R12 while providing reliable cooling performance. When charging R134a systems, remember that the correct type and amount are crucial for optimal operation. Using the wrong refrigerant or incorrect charge amount can damage your system and void warranties.
The process of adding R134a involves more than just connecting a can and pressing a trigger. Understanding system pressures, recognizing when to stop charging, and knowing how to verify proper operation are all essential skills. The goal is achieving the manufacturer's specified cooling performance, not just adding refrigerant until the system seems "cold enough." This precision approach ensures your AC system operates efficiently, protects expensive components like the compressor, and provides reliable comfort for the long term.
If Your Car Air Conditioner Is Blowing Hot Air, A/C Pro Is the Quick & Easy Way to Fix It Yourself and Save Money
If your car air conditioner is blowing hot air, A/C Pro is the quick & easy way to fix it yourself and save money, offering a convenient all-in-one solution for common AC problems. This popular DIY product combines refrigerant, leak sealer, and system conditioner in a single can with a built-in gauge for simplified charging.
A/C Pro's advantages include its ease of use—simply connect the hose to the low-pressure port and add refrigerant while monitoring the built-in gauge. The product includes additives that seal minor leaks around O-rings and connections, potentially solving small leak problems while recharging. The gauge helps prevent severe overcharging, and the quick-connect fitting makes the process accessible to those without mechanical experience.
However, A/C Pro has limitations that users should understand. The built-in gauge is less accurate than professional manifold gauges and may not account for temperature variations. The leak sealer additives can potentially clog expansion valves or orifice tubes if used repeatedly or in systems with major leaks. The product provides only a partial recharge for most vehicles, and the convenience comes at a higher cost per ounce than purchasing refrigerant separately. For best results, use A/C Pro as a first step for minor performance issues, but be prepared to seek professional service if problems persist or if you notice oil residue indicating a significant leak.
An Air Conditioner Has Three Main Parts
An air conditioner has three main parts that work together to remove heat from your vehicle's cabin: the compressor, the condenser, and the evaporator. Understanding these components helps you appreciate how the AC system functions and diagnose problems more effectively.
The compressor is the heart of the AC system, driven by a belt from the engine. It compresses low-pressure refrigerant gas into high-pressure, high-temperature gas, initiating the cooling cycle. The compressor contains the complex internal components that can fail if the system runs low on refrigerant, as inadequate refrigerant flow can cause overheating and lubrication problems.
The condenser, located in front of the radiator, acts like a radiator for the refrigerant. As hot, high-pressure refrigerant flows through the condenser's tubes, outside air flowing through the fins removes heat, condensing the refrigerant into a high-pressure liquid. A clogged or damaged condenser cannot reject heat effectively, reducing overall cooling capacity regardless of refrigerant charge.
The evaporator, located inside the dashboard, does the actual cooling work. As high-pressure liquid refrigerant passes through the expansion valve or orifice tube into the evaporator, it rapidly expands and evaporates into a gas, absorbing heat from the air blown across the evaporator fins. This is where the cold air you feel comes from. A dirty or frozen evaporator can restrict airflow and reduce cooling efficiency, sometimes mimicking the symptoms of low refrigerant.
These three components, connected by refrigerant lines and controlled by various valves, switches, and the vehicle's computer, form a complete system where each part must function correctly for optimal performance. Understanding this relationship helps you identify whether problems are due to refrigerant issues or other component failures.