Sex Tape Measure Secrets: Why Measuring In Inches Is So Thrilling!
Have you ever found yourself staring at a tape measure, completely baffled by the tiny lines and confusing markings? You're not alone! Whether you're a DIY enthusiast, a professional contractor, or simply trying to hang a picture frame perfectly level, knowing how to read a tape measure is an essential skill that can make or break your project. The good news? Once you understand the secrets behind those mysterious markings, you'll be measuring with confidence in no time. Let's dive into the fascinating world of tape measures and unlock the thrilling precision that comes with mastering this fundamental tool.
Understanding Your Tape Measure: The Basics
If you don't know how to read a tape measure, then you've come to the right place. Here we'll break down the different elements you'll find on a standard UK imperial/metric tape measure, revealing what each of the measurement markings and other difficult-to-decipher marks mean.
A typical tape measure features two measurement systems: imperial (inches and feet) on one side and metric (centimeters and millimeters) on the other. The imperial side is what we'll focus on first, as it's the system that often causes the most confusion with its intricate fraction markings.
- The Heartbreaking Leak Alexander Goulds Secret Struggle After Finding Nemo
- You Wont Believe What Was Leaked From Walmart St Croix Falls Back Room
- Jennifer Tillys Secret Leak Uncensored Nude Pictures Revealed
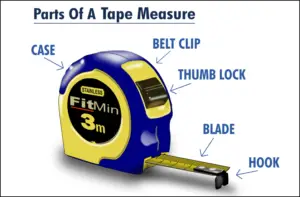
The tape measure's blade (the actual measuring tape) is usually made of steel or fiberglass and can extend to various lengths, typically ranging from 3 to 8 meters (10 to 25 feet). The metal hook at the end, called the tang, is crucial for accurate measurements and deserves special attention.
Decoding Imperial Measurements: The Art of Reading Inches
For imperial units, use the longest marks to measure inches. These bold, prominent lines represent whole inches and are typically numbered for easy reference. Between each inch mark, you'll notice progressively shorter lines that represent fractions of an inch.
Use the next longest lines for ½ inches - these marks appear exactly halfway between each inch. The third longest lines represent ¼ inches, appearing at the quarter points between inches. Moving to even smaller increments, you'll find ⅛ inch marks, followed by 1/16 inch marks, and on some precision tapes, even 1/32 inch markings.
- Uncensored Truth The Explosive Player Stats From Colts Ravens Match You Cant Unsee
- Shocking Leak Best Buys Secret Midnight Nintendo Switch 2 Store List Exposed Is Your Store Included
- The Secret Sex Tapes Hidden In Rosamund Pikes Movie Collection Exposed
Here's a practical breakdown: if you're measuring something that falls between the 3-inch and 4-inch marks, first identify which fraction line it's closest to. If it's at the second-longest mark after 3 inches, that's 3½ inches. If it's at the third-longest mark, that's 3¼ inches, and so on.
Mastering Metric Measurements: A Simpler Approach
For metric units, measure centimeters with the longest markings. These bold lines, typically numbered, represent whole centimeters and are spaced 10 millimeters apart. The beauty of the metric system lies in its decimal nature, making calculations much simpler than with imperial fractions.
Use each of the smaller marks to find the length in millimeters. The smaller lines between centimeter marks each represent 1 millimeter. Since there are 10 millimeters in a centimeter, you'll count up to 9 small lines between each bold centimeter mark.
For example, if your measurement falls on the third small line after the 15-centimeter mark, that's 15.3 centimeters or 153 millimeters. The metric system's straightforward approach eliminates the need for complex fraction calculations, making it particularly useful for precision work.
Taking Accurate Measurements: Step-by-Step Process
Stretch your measuring tape across the object you want to measure, ensuring the tape remains straight and flat. Find the nearest full measurement and add the length from the smaller fractional or millimeter marks to get your total measurement.
Practical steps for accurate measurement require you to first place the metal hook, or tang, of the tape measure securely against the starting edge of the material. This hook is engineered to slide slightly, compensating for its own thickness, ensuring an accurate reading whether measuring an inside or outside dimension.
When measuring, keep the tape straight and avoid bending or kinking it. For longer measurements, use a helper to hold the end or use a surface to support the tape. Always read the measurement at eye level to avoid parallax errors that can occur when viewing from an angle.
Understanding Tape Measure Features and Markings
Mastering how to read inches on a tape measure is a straightforward process once you learn to recognize the patterns in the tape measure markings. Beyond the basic inch and fraction markings, many tape measures include additional features that can be incredibly useful.
Many tapes include red markings at 16-inch intervals, which correspond to standard stud spacing in construction. Black diamond symbols appear every 19.2 inches and indicate floor truss spacing. Some tapes also feature a "true zero" marking near the hook, helping you account for the hook's movement when measuring inside versus outside dimensions.
The hook itself is designed to move slightly - this isn't a flaw but rather an intentional feature. When measuring inside dimensions (like the width of a window frame), the hook compresses slightly. For outside measurements (like the length of a board), the hook extends. This movement compensates for the hook's thickness, ensuring accurate measurements in both scenarios.
Tips for Perfect Measurements Every Time
Confused by all those tiny lines? No confusion—just clear, practical tips to help you measure perfectly every time. First, always ensure your tape measure is in good condition. A bent or damaged tape can lead to inaccurate measurements.
When reading fractions, count the number of lines between inch marks to determine the denominator. If there are 8 lines between inch marks, each represents 1/8 inch. If there are 16 lines, each represents 1/16 inch. This simple trick can help you quickly identify what each marking represents.
For the most accurate readings, use the tape's lock mechanism when possible to prevent retraction while you're reading the measurement. When measuring long distances, hold the tape level and straight - sagging can add several inches to your measurement over longer spans.
Choosing the Right Tape Measure for Your Needs
Learn how to read a measuring tape accurately with our comprehensive guide, but also understand that not all tape measures are created equal. The right tape measure for you depends on your specific needs and the type of work you're doing.
For general home use, a 25-foot tape measure with both imperial and metric markings is usually sufficient. Professional contractors might prefer longer tapes (30-35 feet) with reinforced blades for durability. Specialty tapes include magnetic hooks for working with metal, digital readouts for extremely precise measurements, and even laser tape measures for long distances.
Consider the tape's standout length (how far it can extend without bending), the size and readability of the markings, and whether you need metric measurements. Some users prefer wider blades for increased rigidity, while others prioritize compact size for portability.
Common Measurement Mistakes to Avoid
Even experienced DIYers can make measurement mistakes that lead to costly errors. One common mistake is not accounting for the hook's movement when measuring inside versus outside dimensions. Remember that the hook is designed to slide slightly - this isn't a defect but rather a feature that ensures accuracy.
Another frequent error is reading the tape from an angle, which can cause parallax errors. Always view the measurement directly from above for the most accurate reading. Additionally, avoid bending the tape around corners or curves unless specifically measuring those shapes.
Failing to double-check measurements is perhaps the most costly mistake. The old adage "measure twice, cut once" exists for good reason. Taking an extra moment to verify your measurements can save you from wasting materials and time.
Conclusion: Mastering the Art of Measurement
Understanding the units of measurement, deciphering fractions, and measuring in inches, feet, or centimeters are fundamental skills that will serve you well in countless projects. Whether you're building furniture, hanging artwork, or tackling home renovations, the ability to read a tape measure accurately is invaluable.
Remember that practice makes perfect. The more you work with your tape measure, the more intuitive reading those markings will become. Start with simple projects and gradually work your way up to more complex measurements. Soon, those confusing lines will transform into a language of precision that you can read fluently.
By following these guidelines and practicing regularly, you'll develop the confidence to tackle any measuring task that comes your way. The secrets of the tape measure are now yours to master - happy measuring!