How To Draw A Nose: A Complete Beginner's Guide
Have you ever wondered how artists create such realistic noses in their drawings? Drawing a nose might seem intimidating at first, but with the right approach and techniques, anyone can master this essential facial feature. Whether you're sketching portraits or creating character designs, understanding how to draw a nose is fundamental to your artistic journey.
Understanding Nose Anatomy and Basic Shapes
Everybody has one, and they come in tons of different shapes, sizes, and curves. Noses are as unique as fingerprints, making them both challenging and fascinating to draw. Before diving into the drawing process, it's crucial to understand that the nose can be broken down into basic geometric shapes. This simplification is the key to making nose drawing accessible to beginners.
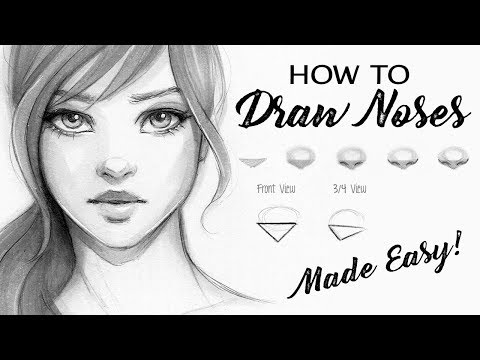
In order to easily draw the nose, we need to take the structure and simplify it to its basic shapes. Think of the nose as a combination of spheres, cylinders, and triangles. The bridge of the nose can be visualized as a long cylinder, while the tip is often represented by a sphere. The nostrils can be simplified into teardrop or oval shapes. By starting with these basic forms, you'll create a solid foundation for your nose drawing.
- Gia Duddys Explicit Leak Full Sex Tape Exposed Watch Before Deleted
- Shocking Alex Fines Nude Photo Leak Reveals His Secret Multi Million Dollar Fortune
- Explosive Al Nassr Vs Al Riyadh Sex Drugs And Football Fury Uncovered
Step-by-Step Nose Drawing Tutorial
Though making a nose drawing may seem daunting at first, taking it step by step will make the process simple and fun. Let's break down the process into manageable steps that anyone can follow:
Step 1: Start with Basic Shapes
Begin by lightly sketching a circle for the tip of the nose and two lines extending upward for the bridge. This basic structure will serve as your guide for the entire drawing.
Step 2: Define the Bridge and Nostrils
Draw the nose bridge and nostrils now we're going to draw the nose bridge and nostrils, try to use curvy organic lines for this step, and fill the nostril with two or three layers of graphite. Remember that the bridge should have a gentle curve that follows the natural contour of the face.
- Exclusive Leak Ames Movies 12 Theaters Secret Adult Screenings Exposed
- Montrose Coffee Nightmare Black Holes Dark Secret Leaked You Must See This
- Nude Beauty Hack Goes Viral Find The Best Supply Near Me Before Its Gone
Step 3: Add Nostril Details
Draw in the 'c' shape of the opening of the nostril on either side of the ellipse. By plotting out this shape, you will have a better idea of where the outer part of the nostril is, and how to go about adding shadow to the receding areas. This all helps you build your sketch towards being a realistic nose drawing.
Step 4: Refine the Shape
Draw the shape of the outer nostril. Pay attention to the subtle curves and how they connect to the bridge. Each person's nostrils have a unique shape, so observe reference images carefully.
Creating Realistic Shading and Depth
Learn how to create a variety of nose shapes using this method! The key to making your nose drawing look three-dimensional is mastering shading techniques. Here's how to approach it:
Start with light pressure and gradually build up layers of graphite to create depth. The areas where light hits the nose should remain lighter, while the areas in shadow should be darker. Pay special attention to the underside of the nose and the inner parts of the nostrils, as these areas naturally receive less light.
Need help drawing a realistic nose? This tutorial breaks down how to draw a nose into four simple steps, including how to sketch the shape and build up shading. Remember that the light source affects how shadows fall on the nose. If the light is coming from above, the underside of the nose will be in shadow, creating a darker area that helps define the shape.
Different Angles and Perspectives
This article covers how to draw a nose from the front, at an angle, and in profile to help you master this challenging facial feature. Each perspective requires a slightly different approach:
Front View: When drawing a nose from the front, focus on symmetry and the central placement on the face. The nostrils should be evenly spaced, and the bridge should appear straight or slightly curved depending on the individual.
Side View (Profile): For a profile view, the nose becomes more linear. You'll see the full curve of the bridge and a clear outline of the nostril. The tip of the nose will protrude more noticeably in this view.
Three-Quarter View: This angle combines elements of both front and side views. You'll see one nostril more clearly than the other, and the bridge will appear slightly turned.
Advanced Techniques for Nose Drawing
How to draw a nose step by step is a fundamental skill for anyone interested in portrait drawing or character design. The nose, with its unique structure and subtle curves, can be one of the trickiest facial features to master. Here are some advanced tips to elevate your nose drawings:
Study Different Nose Types: Noses come in various shapes and sizes, and accurately depicting them can elevate your sketches. Take time to observe different nose shapes in real life or through reference photos. Notice how ethnicity, age, and individual characteristics affect nose structure.
Practice with Different Mediums: While this guide focuses on pencil techniques, try experimenting with charcoal, ink, or digital tools. Each medium offers unique possibilities for capturing the subtle details of noses.
Understand Light and Shadow: How to draw a realistic nose with a pencil drawing a realistic nose is a crucial skill in mastering portrait art. The interplay of light and shadow is what makes a nose appear three-dimensional. Study how light falls on different nose shapes and practice recreating these effects.
Quick Tips for Beginners
This tutorial for beginners shows you the basics of how to draw a nose in 10 minutes, along with the steps required so it doesn't matter if you're a beginner, or intermediate. Here are some quick tips to keep in mind:
- Start with light, sketchy lines that you can easily erase
- Use reference images to understand different nose shapes
- Practice drawing noses from different angles
- Don't get discouraged if your first attempts don't look perfect
- Remember that every nose is unique, so there's no single "correct" way to draw one
Common Mistakes to Avoid
When learning how to draw a nose, beginners often make some common mistakes. Being aware of these can help you improve faster:
Making the nose too big or too small: The size of the nose should be proportional to the rest of the face. A common error is making the nose too prominent or too small in relation to other facial features.
Drawing nostrils too dark: While nostrils are naturally darker, they shouldn't be pure black. Use subtle shading to suggest their shape without overpowering the rest of the drawing.
Ignoring the bridge: The bridge of the nose connects to the forehead and is crucial for creating a natural-looking face. Don't forget to include this important element.
Practice Exercises
Want to learn how to draw a nose realistically using just a pencil? This easy nose drawing tutorial is designed for complete beginners and drawing learners who want simple, effective techniques. Here are some exercises to help you practice:
Exercise 1: Basic Shape Practice
Draw 10 different noses using only basic geometric shapes. Focus on getting the proportions right before adding details.
Exercise 2: Shading Practice
Create a series of nose drawings focusing solely on shading. Use a single light source and practice creating depth through shadow.
Exercise 3: From Life
If possible, practice drawing noses from real people or from photographs. This will help you understand the variations in nose shapes and how they sit on different faces.
Conclusion
Learning how to draw a nose is an essential skill for any artist, whether you're a beginner or more experienced. By breaking down the process into simple steps, understanding basic anatomy, and practicing regularly, you'll soon be able to draw noses with confidence and realism.
Remember that drawing is a skill that improves with practice. Don't be discouraged if your first attempts don't meet your expectations. Keep practicing, study different nose shapes, and most importantly, enjoy the process of learning and creating. With time and dedication, you'll master the art of drawing noses and be able to create stunning, realistic portraits that capture the unique character of each individual.
Whether you're drawing for fun, studying art, or pursuing a career in illustration, the ability to draw noses accurately will serve you well throughout your artistic journey. So grab your pencil, follow these steps, and start creating beautiful nose drawings today!